打造自己專屬的iTerm2
打造自己專屬的 iTerm2
前言
紀錄一下自己在使用 iTerm2 時的一些開發環境設定,不然每次更新或重裝系統時,都會忘。
Package Manager 套件管理工具
Homebrew
macOS 的使用者一定對Homebrew不陌生吧。
Homebrew是一套 macOS 上很好用的套件軟體管理工具,他可以只用指令就幫你快速的安裝好你所需要的工具。
安裝 Homebrew
1 | /bin/bash -c "$(curl -fsSL https://raw.githubusercontent.com/Homebrew/install/HEAD/install.sh)" |
搜尋套件
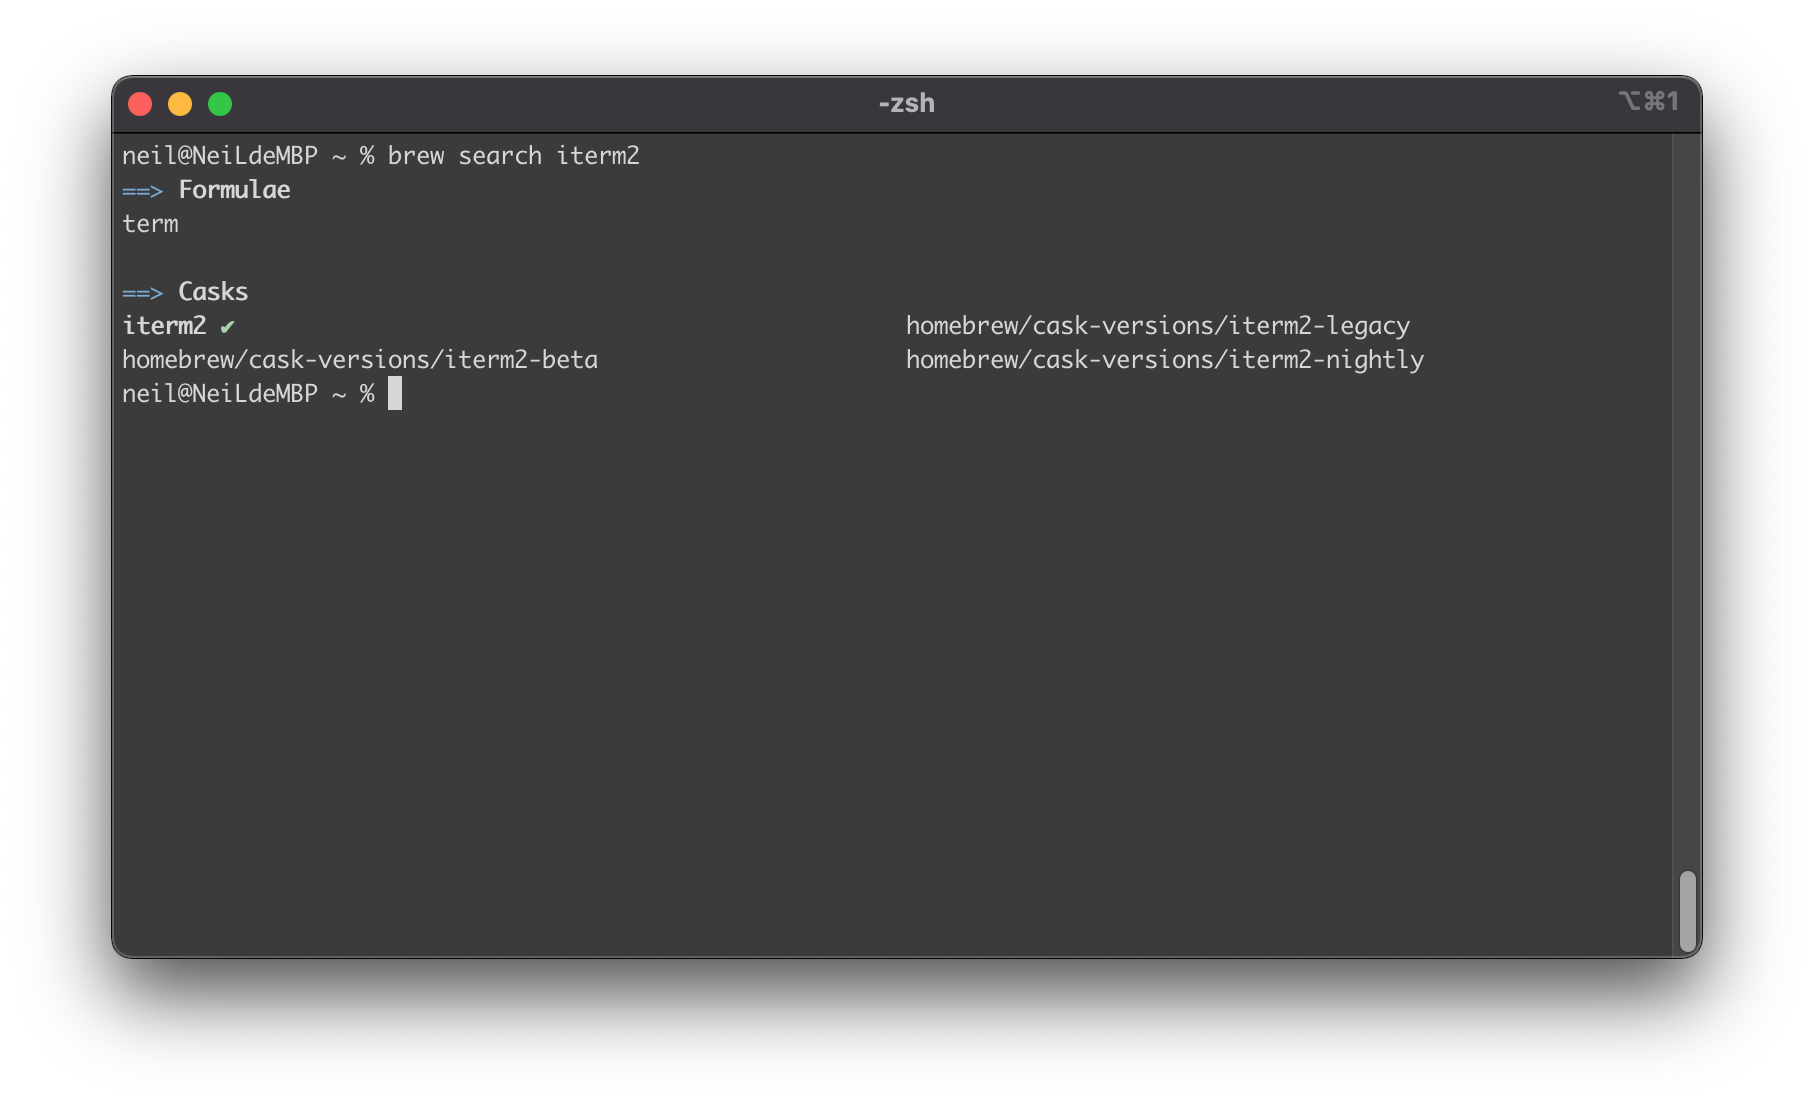
可以使用$brew search來搜尋想安裝的套件或軟體,輸入關鍵字會出現名稱雷同的套件供你查詢。
1 | brew search git |
安裝套件
安裝套件的方式很簡單,如果不確定套件名稱是否正確可以先搜尋。
1 | brew install iterm2 |
更新套件
正常是三個步驟,但這是三個不同指令合在一起使用,比較方便。
brew update:更新 Homebrew 及套件清單brew upgrade:更新所有套件brew cleanup:清除所有套件的舊版本或暫存檔
1 | brew update && brew upgrade && brew cleanup |
一些常使用的指令
1 | brew search TEXT|/REGEX/ # 搜尋FORMULA|CASK |
特殊指令
1 | brew tap:適用於安裝不在 homebrew 的第三方套件(會增加 homebrew 的 formulae) |
Terminal
使用 iTerm2 + zsh + Oh My ZSH 配置。
zsh 自 macOS 系統為 Catalina 版本後,就已經取代原本的 bash 了,所以不需要再額外安裝。
字體
因為等一下要安裝 Oh My ZSH 的主題,會有很多符號圖示,一般的字體會有字體缺失的問題,所以需要額外安裝Powerline-Fonts或Nerd-Fonts 。
早期都是安裝 Powerline,現在有新的選擇可以使用 Nerd-Fonts,它已將 Powerline-Fonts、Font Awesome 等多樣圖示整合進去。
我選擇使用 Nerd-Fonts 的font-meslo-lg-nerd-font。
安裝
字型都可以使使用 Homebrew 來安裝
1 | brew tap homebrew/cask-fonts # You only need to do this once! |
iTerm2
iTerm2是一個可以取代 macOS 自帶的終端機工具,擁有許多更方便的功能跟特色。
安裝
1 | brew install --cask iterm2 |
不習慣使用Homebrew安裝的朋友,可以到 iTerm2 的Download頁面去下載安裝。
設置
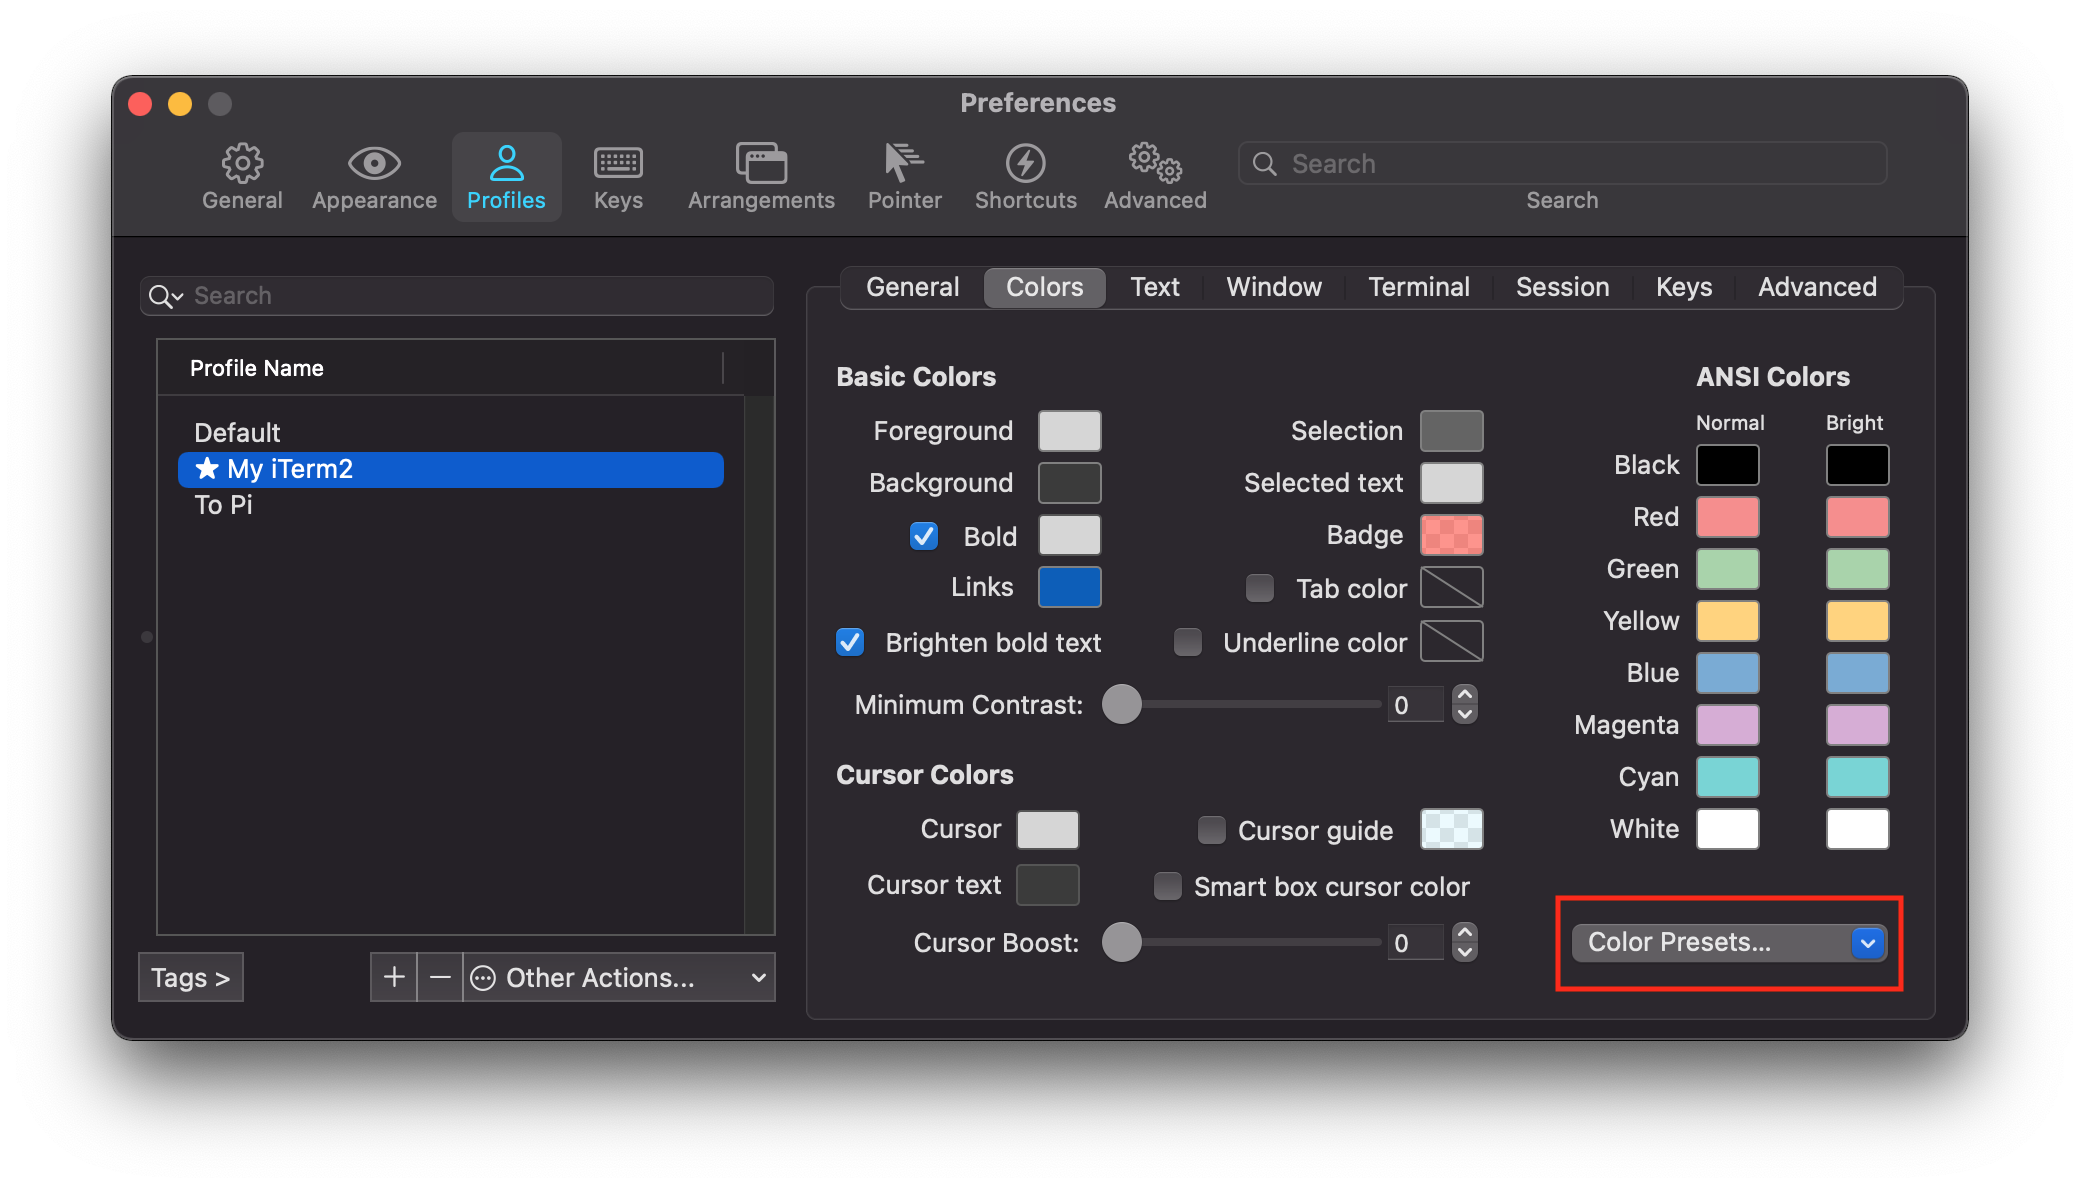
主題顏色
當然最重要的就是改主題顏色啦!
Iterm2-color-schemes裡面有許多配色可供選擇,我個人習慣使用Tomorrow Night Eighties這個配色。
下載取得副檔名為.itermcolors檔案後,打開 iTerm2,快捷鍵cmd+i打開preferences,選擇Profiles頁面 →Colors頁面 → 左下角下拉選單選擇import,把剛剛下載的配色.itermcolors匯入,之後再下拉選單選擇該配色選項。
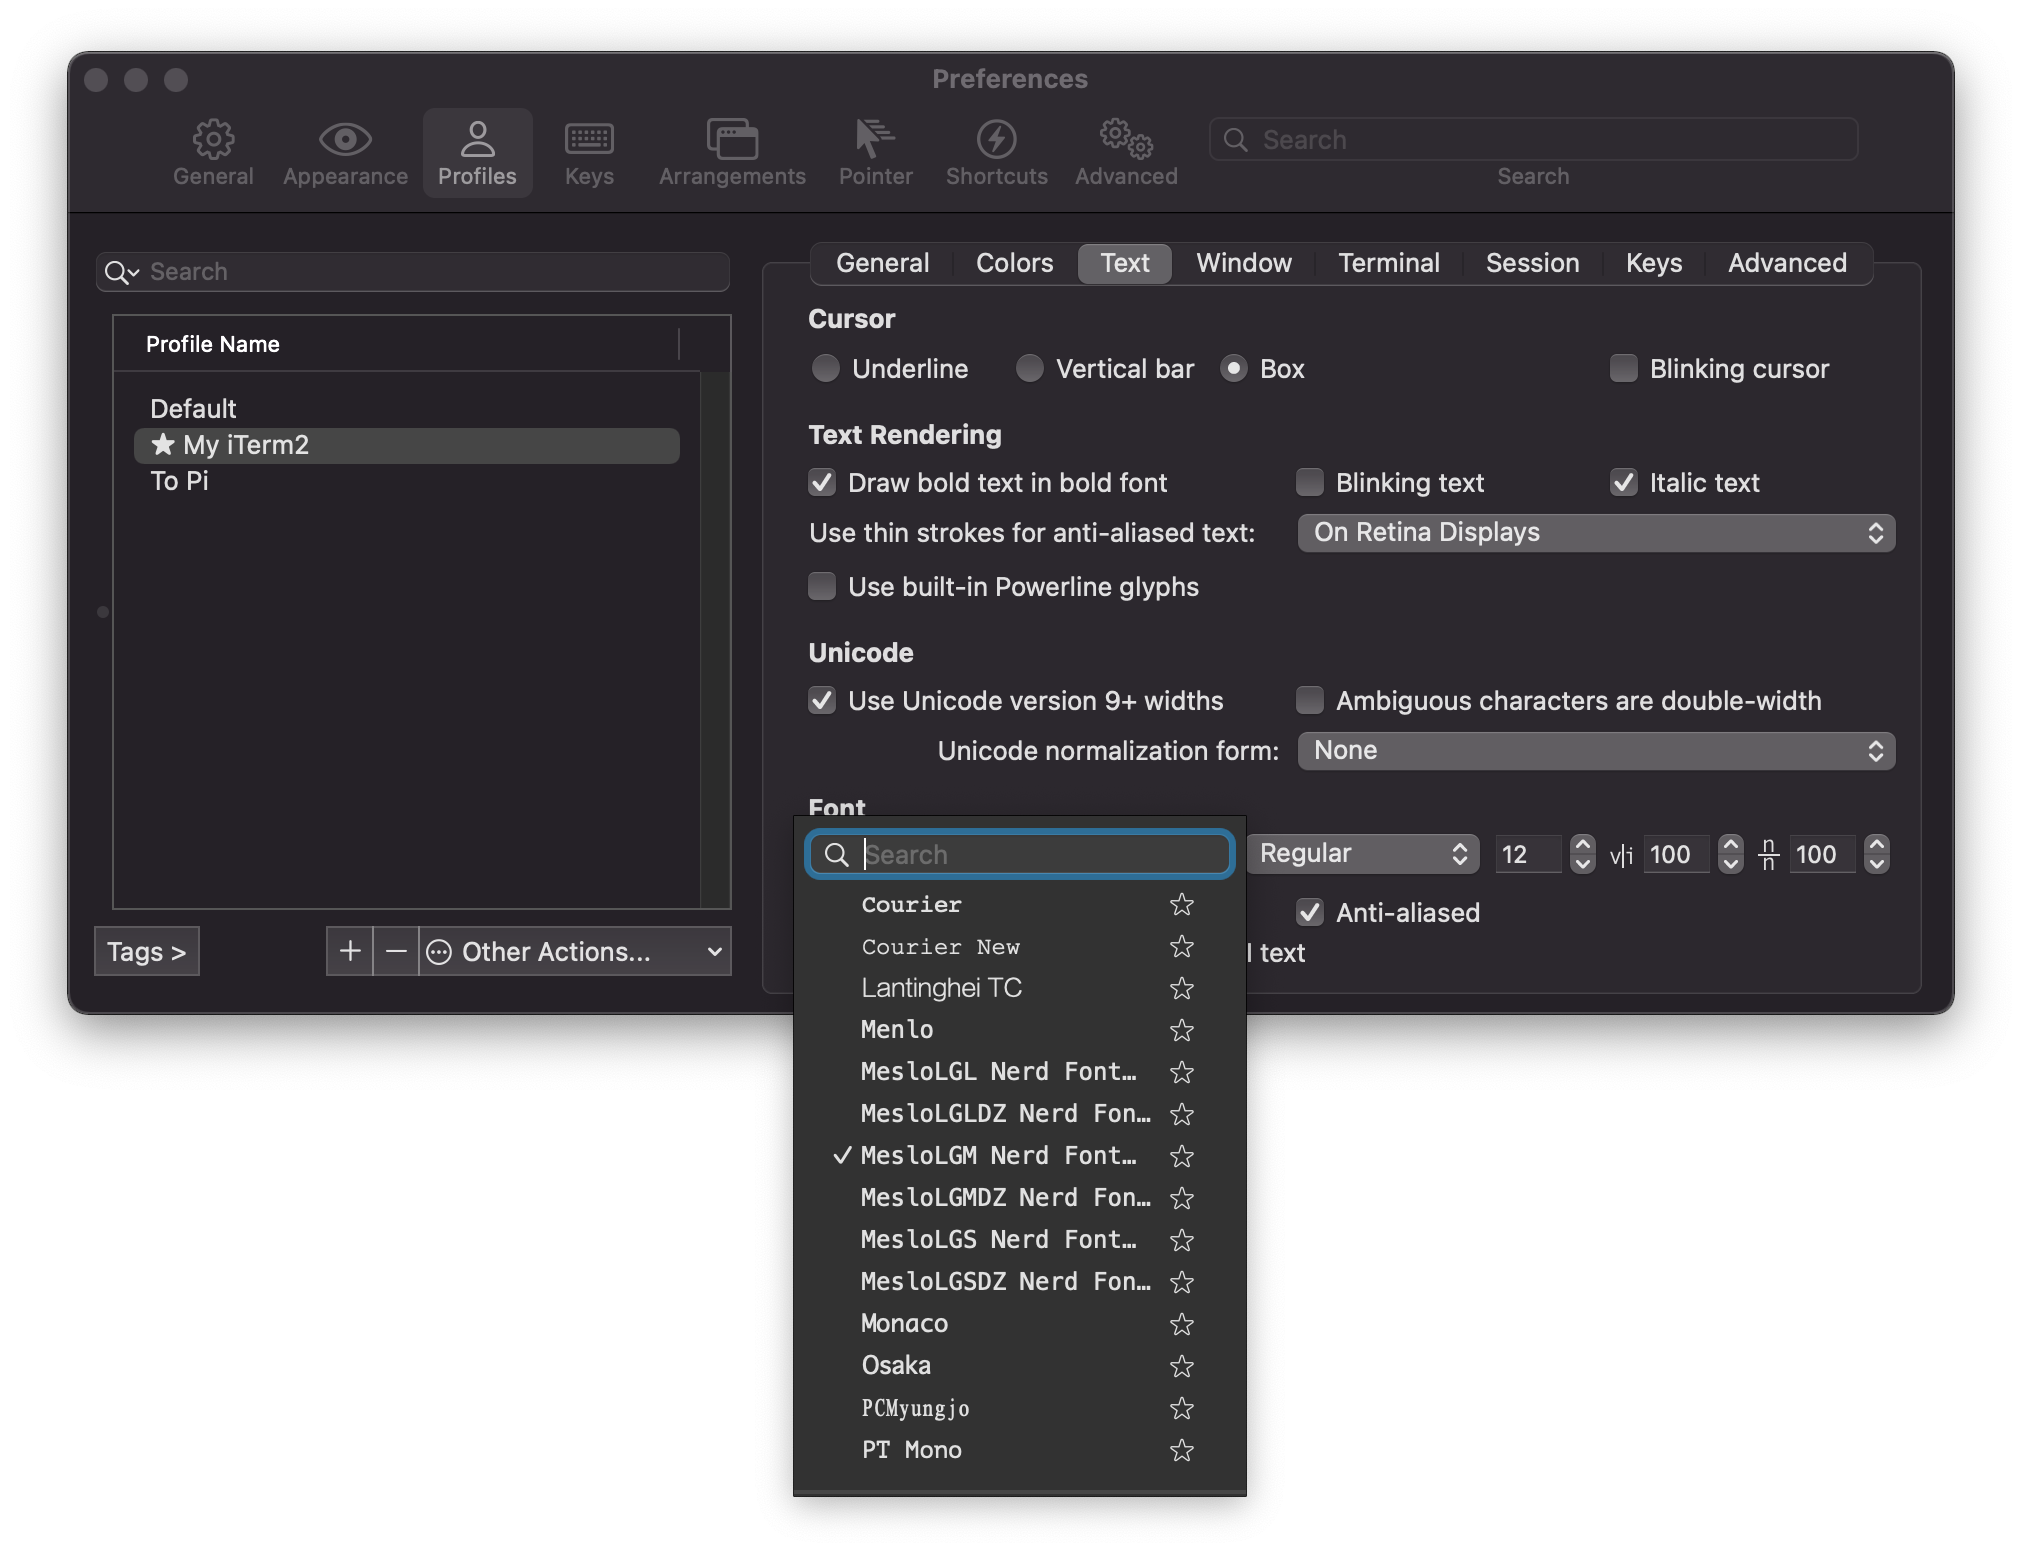
設定字型
設定字型一樣在Profiles頁面 →Text頁面中的 Font 下拉選單中選取MesloLGM Nerd Font Mono。
其實還有其他大小可以選擇,有MesloLGL Nerd Font Mono及MesloLGS Nerd Font Mono,端看自己習慣選擇。
下面還有一個Use a different font for non-ASCII text選項可打勾,但我目前不知道沒勾有沒有影響。
Oh My ZSH
Oh My ZSH是一套強大的框架,集合了很多好用的主題/套件來管理 zsh。
安裝
安裝方式跟 Homebrew 一樣簡單,沒什麼好說的。
1 | sh -c "$(curl -fsSL https://raw.github.com/ohmyzsh/ohmyzsh/master/tools/install.sh)" |
設置
安裝完成後,可以修改主題/新增套件,Oh My ZSH 內建很多Themes可供選擇。
首先我們要先打開他的設置~/.zshrc。
1 | open ~/.zshrc |
有很多設定可以改,我就只說明一些常用的。
1 | ZSH_THEME="agnoster" #設定Theme主題名稱,以agnoster主題為例 |
Plugins
以下提供兩種安裝方式:
- Homebrew 安裝在 zsh 中
- 安裝到 Oh My ZSH 中管理 (recommend )
Zsh-autosuggestions
zsh-autosuggestion 是一款指令(command)補全提示的 Plugin。
使用 Homebrew 安裝在 zsh(沒有 Oh My ZSH 也能安裝):
1
brew install zsh-autosuggestions
安裝完成後,需到
.zshrc中添加以下代碼 activate 此 Plugins1
source /usr/local/share/zsh-autosuggestions/zsh-autosuggestions.zsh
重新開啟 iTerm2
安裝在 Oh My ZSH 中
Clone this repository into
$ZSH_CUSTOM/plugins(by default~/.oh-my-zsh/custom/plugins)1
git clone https://github.com/zsh-users/zsh-autosuggestions ${ZSH_CUSTOM:-~/.oh-my-zsh/custom}/plugins/zsh-autosuggestions
Add the plugin to the list of plugins for Oh My Zsh to load (inside
~/.zshrc):1
2
3
4plugins=(
# other plugins...
zsh-autosuggestions
)提示不明顯,修改提示顏色(Xterm_256color)
1
2
3
4
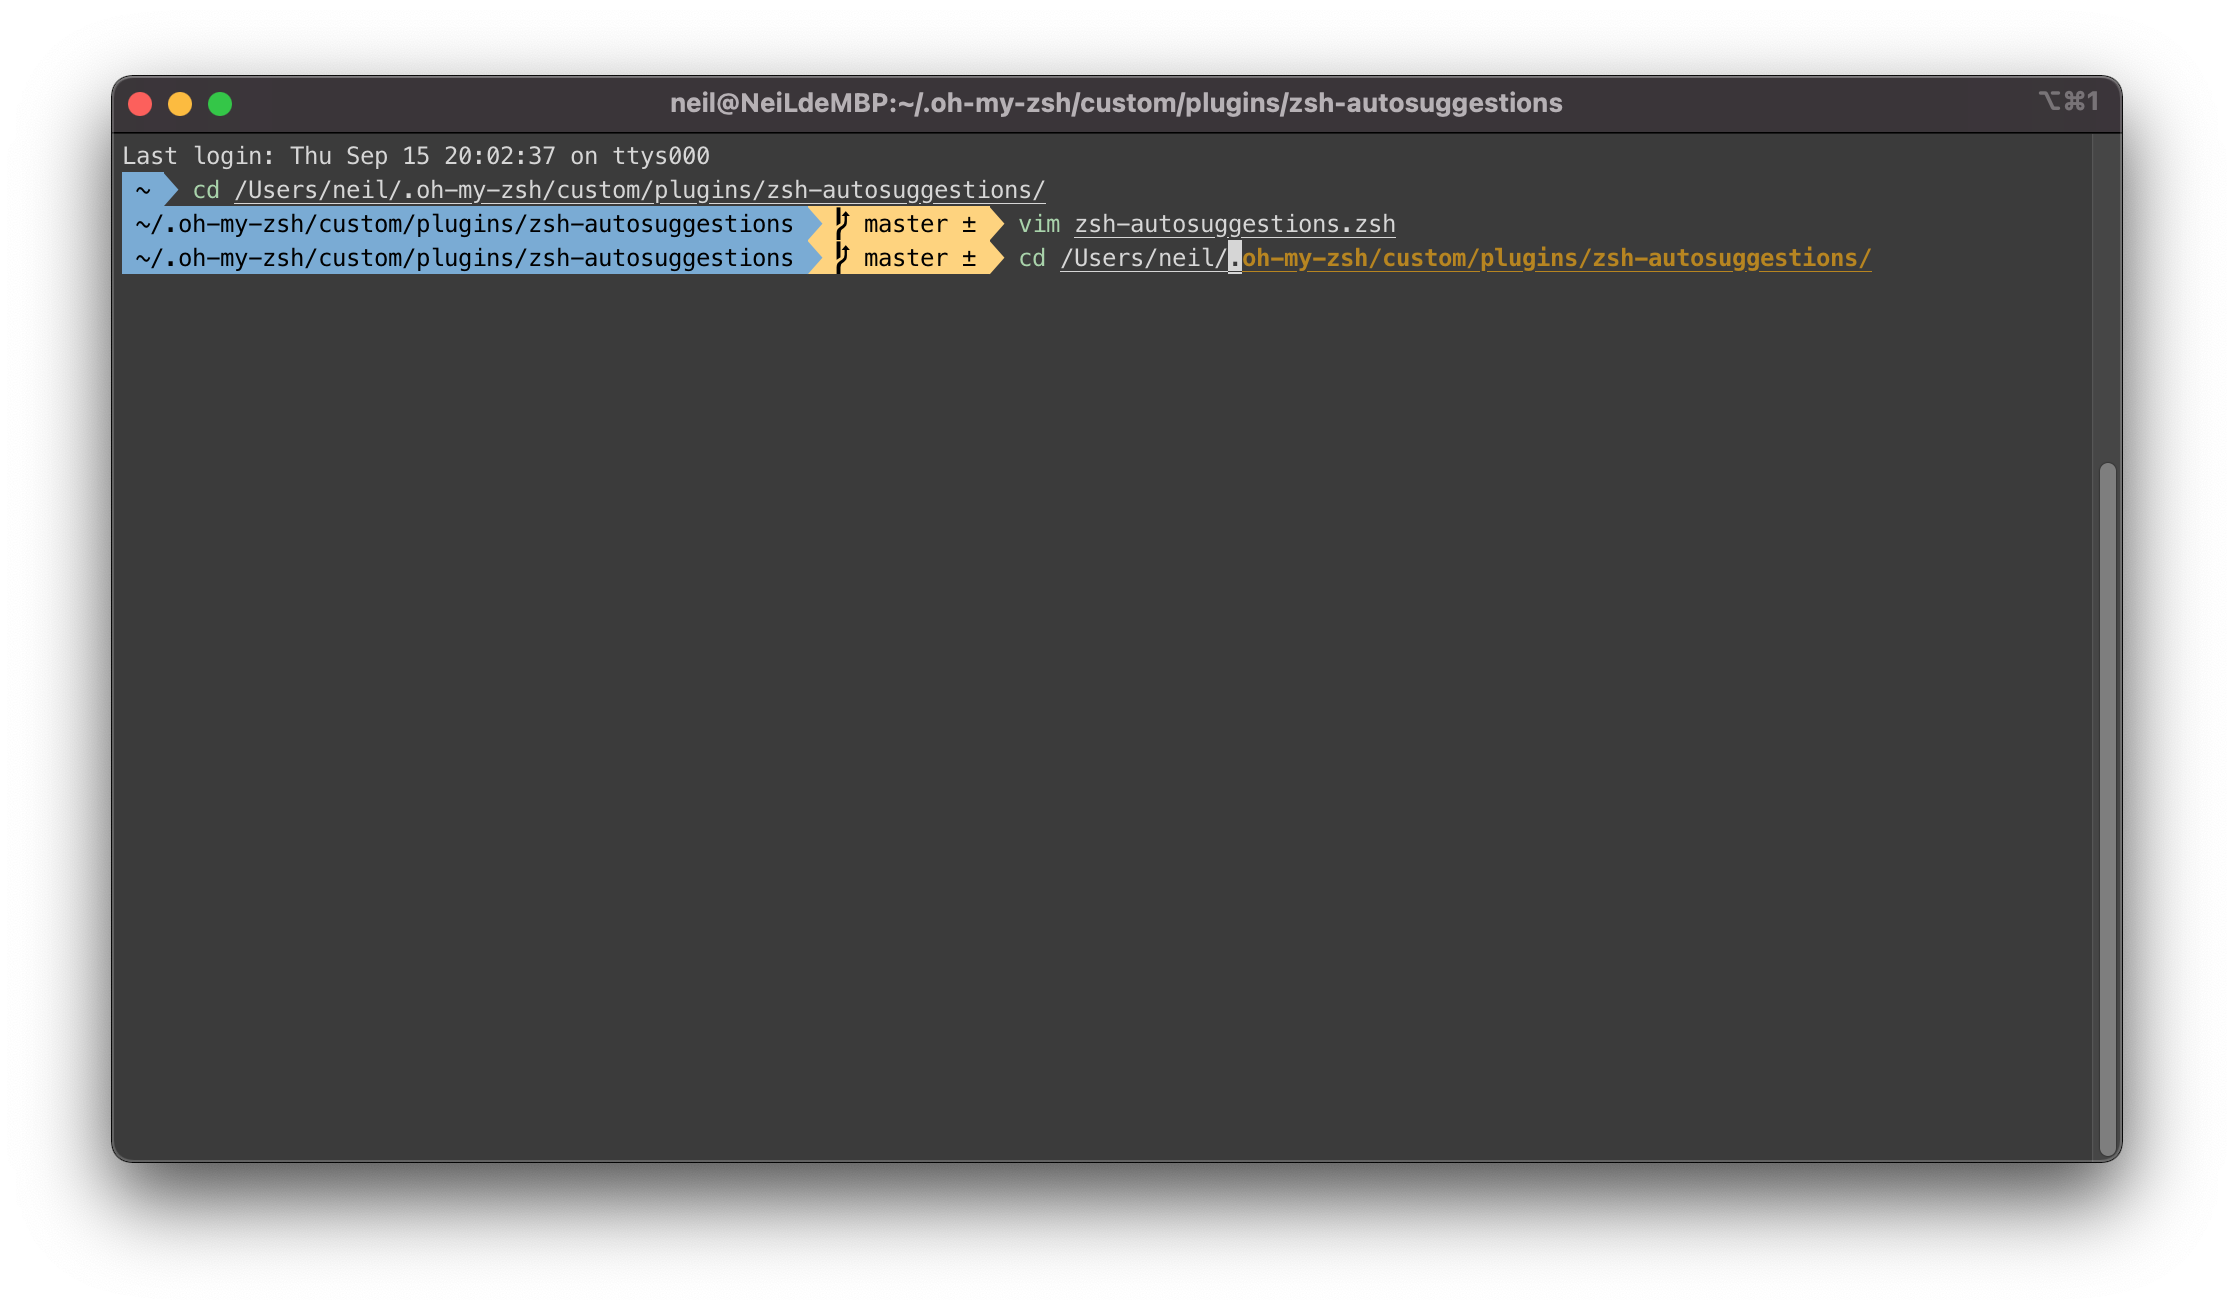
5cd /Users/neil/.oh-my-zsh/custom/plugins/zsh-autosuggestions/
vim zsh-autosuggestions.zsh
找到這行指令,可修改字體顏色、背景顏色、字體樣式
ZSH_AUTOSUGGEST_HIGHLIGHT_STYLE="fg=#ff00ff,bg=cyan,bold,underline" # 官方範例
ZSH_AUTOSUGGEST_HIGHLIGHT_STYLE="fg=#B8860B,bold,underline" # 僅修改字體顏色、粗體、下底線重新開啟 iTerm2
zsh-syntax-highlighting
zsh-syntax-highlighting 語法高亮:語法指令錯誤時顯示紅色,直到輸入正確才會變綠色。
使用 Homebrew 安裝在 zsh(沒有 Oh My ZSH 也能安裝):
1
brew install zsh-syntax-highlighting
安裝完成後,需到
.zshrc中添加以下代碼 activate 此 Plugins1
source /usr/local/share/zsh-syntax-highlighting/zsh-syntax-highlighting.zsh
重新開啟 iTerm2
安裝在 Oh My ZSH 中
Clone this repository into
$ZSH_CUSTOM/plugins(by default~/.oh-my-zsh/custom/plugins)1
git clone https://github.com/zsh-users/zsh-syntax-highlighting.git ${ZSH_CUSTOM:-~/.oh-my-zsh/custom}/plugins/zsh-syntax-highlighting
Add the plugin to the list of plugins for Oh My Zsh to load (inside
~/.zshrc):1
2
3
4
5plugins=(
# other plugins...
zsh-autosuggestions
zsh-syntax-highlighting
)重新開啟 iTerm2
git-open
git-open可以讓你輸入 git open 在瀏覽器中打開該 repo 的網站(GitHub, GitLab, Bitbucket)。
安裝在 Oh My ZSH 中
Clone this repository into
$ZSH_CUSTOM/plugins(by default~/.oh-my-zsh/custom/plugins)1
git clone https://github.com/paulirish/git-open.git $ZSH_CUSTOM/plugins/git-open
Add the plugin to the list of plugins for Oh My Zsh to load (inside
~/.zshrc):1
2
3
4
5
6plugins=(
# other plugins...
zsh-autosuggestions
zsh-syntax-highlighting
git-open
)重新開啟 iTerm2
問題
在裝完 Oh My ZSH 時,我的 nvm、node、npm 指令都無法使用了zsh: command not found: nvm,去查看一下.nvm資料夾還在,只是在.zshrc中的 nvm 指向不見了,重新貼回去就可以用了。
1 | 打開.zshrc將以下指令貼上就能恢復了 |
完成品
折騰了這麼久,終於搞定了個自己比較習慣的樣式,Plugin 不想裝太多,怕之後 iTerm2 開啟速度會變慢。
使用 iTerm2 來個漂亮好用的終端機 > iTerm2 + Oh My Zsh + Solarized color scheme + Source Code Pro Powerline + Font Awesome + [Powerlevel10k] - (macOS)